Sunday, October 12, 2014

One Special Wedding

Hello World!

I'm back with another wedding cake topper!

This one I made this past summer for my best friend's wedding. Out of all the cake toppers I made, this one was, and is, probably my favorite. Unlike my previous cake toppers, I made the body of the people much smaller and shorter than compared to all the other ones. 

Star Wars theme!

Making the body so much smaller and the head so much bigger proved to be difficult to balance (since it was top-heavy), but I think I liked the way it turned out better. When I was first commissioned to make this cake topper, I was asked to make it Star Wars themed, soo... that meant Han Solo and Princess Leia. Haha. XD Hence the reason why the bride's hair is in two buns, rather than what her actual hairstyle was on her wedding day. And hence the reason why the groom is dressed in another outfit rather than a suit.

My main inspiration came from here and here. Of course, I still tried to add elements into the facial features of the people to make them resemble the bride and the groom more. After this project, I came to the solid conclusion that... regardless of the color of the clay that I'm working with... I should always use gloves. Even though other people can't tell... dust gets mixed easily into the clay, and it becomes noticeable... close up... to me. Haha. XD


Unfortunately I don't have many pictures of this wedding cake topper. Because... for the first time... I was part of the bridal party! Haha. I didn't get a chance to actually see the cake topper on top of the cake (Or I didn't have time to pay attention to it), since I was running around for most of the day. Totally exhausting, but totally worth it!

There were many elements of this cake topper that were fun to make. I literally braided three strands of clay to make the buns on the side of the bride's head; the elements for the groom's outfit were detailed, but not too hard to make; I gave the bride a lightsaber to keep her man in check, but gave the groom a gun because, well... you don't see Han Solo using a lightsaber in Star Wars.

My absolute favorite part of this cake topper was the groom's gun. You can't tell in the picture... but actually the gun on the side of the groom is removable! It took me a while to figure it out, but I fashioned a tiny gun and managed to make a holster for his gun. Unfortunately, I didn't really publicize that aspect of the cake topper, so I honestly don't know if people were careful about that part of it. For all I know... that gun could be lost somewhere in the church. Haha.

Well... that's all for this post! Like I said, I was pretty pre-occupied before the wedding and during the wedding... so I wasn't able to take a lot of pictures. I'm pretty sure I finished the cake topper pretty late that night, so I didn't bother to take pictures of individual elements (something that I regret now... Haha).

But here's a picture of the cake topper on top of the cake (Full disclosure - I took it from my friend's album on Facebook. Haha):

Final product on cake! Credits: SC

As always, thanks for reading!

:)

Saturday, October 4, 2014

Wedding Topper: Attempt #2


Hello world!
It's been a while... but it's been a busy while for me! Lots of changes have happened within the last half year that I've been MIA from the blogging world.

I no longer live in San Diego; I've moved home.

I no longer have a full-time, permanent job; I have a contract job that ends in November.

I'm only going to be in America for a few more months... then it's off to grad school!

With so many changes, I've neglected my blogging and my love of arts and crafts. :( But enough about the changes in my life... let's talk about the changes in other people's lives!

*cue smooth transition*

Weddings!

I've had the honor and pleasure of making art pieces for a few weddings before (check out my first wedding cake topper and my DIY bowl)... and I've made a few others during this past year, but I have yet to post about them.

This wedding cake topper was for another church couple that I truly admire and respect. I've had so many good conversations with them, and I was so excited and happy to be able to make a wedding cake topper for them! Each wedding item that I've made thus far have had it's different challenges, making each piece unique, as well as fun to make.

No faces yet, just the bodies!
One particular bit, which was probably the most difficult part of the cake topper, was the emblem that I made for the groom. Because I was unfamiliar with the image I was trying to make (and also because it was so darn small) I had to remake this part quite a few times. Haha. XD The bride had asked me to make a small star trek emblem for the groom. Although you can't really see the detail in these pictures below... trust me when I say that... it was actually quite difficult to make... especially because the emblem was probably around 5 cm....


Making the dress for the bride was actually a lot of fun for me. Probably because that was one of the easier aspects of the cake topper, and the effect was stunning! I took small, circular pieces of clay and made a single imprint on one end of the circle to make the inner portion of each flower pedal. The more pedals I added, the more I was pleased with the overall effect.

Sigh. So much dust on her pearl white dress. :(
The hair was fun to make too! Just add tiny curls!

One of my favorite parts is always making the tiny additions, such as flowers and leaves. Then, when all the little pieces are assembled everything... that's when I feel like I'm actually producing something of worth.


The colors for the wedding were orange and blue

Finished product!


Up close details

And, of course, nothing can compare to seeing my product being used at the actual wedding! This cake was made by a self-taught pastry chef! I was so impressed that he baked a wedding cake all by himself!

Orange roses to match my clay roses!

As always... thanks for reading! One more wedding topper post to come!

:)

Sunday, March 2, 2014

Over-Thinker

Joy Wu: Over-thinker extraordinair, task-completer... barely there...

I have a confession.

I'm an over-thinker.


I think too much, I analyzing too much, but I find it difficult to carry out my ideas.

Take this past January (and February), for example. I've had at least five different ideas of topics to write about in Janurary. Many of which were time-sensitive (i.e. revolved around New Year's or Chinese New Year, etc.), most of which I already uploaded pictures for, and all of which I had started typing out, but never completed. Each week I had thought about something I wanted to write about, something I wanted to do... but, somehow, my aspirations always seem to fall short. Hence, the lack of posts for these past few months. Even this post, this very post, it has taken me about 2 weeks to draft and finally publish. I started writing this post in February. And now... its March.

You, as my readers, might be thinking to yourself, "No big deal, it's just a blog... nobody's judging or anything."

To which I would say, why thank you, kind readers. But your kindness does not comfort me.

You see, this habit of mine does not end with blogging. In fact... this habit overflows to much of everything in my life. Whether it be for projects that I want to work on, schools or jobs I want to apply to, or even areas where I want to serve in church.

I over-think. I over-analyze. I come up with every "what if" circumstance possible, even before anything has happened. Therefore, rather than moving forward and accomplishing things I have set out in my life, I stay stagnant and grumble about how I have not change. How my circumstances have not changed.

When it comes down to it, I fear the future. I fear change in the future, therefore I do not pursue anything. I long for change, but I fear the consequences and challenges that change brings.


In these times, the verse that I fall back on is this:

"For I know the plans I have for you, declares the LORD, plans for welfare and not for evil, to give you a future and a hope." (Jeremiah 29:11)

Even though I fear, I know that God is there for me, telling me to keep working hard. Telling me not to listen to that small voice of doubt that tells me I will fail. Telling me that He does indeed have greater plans for me than what I am doing now. I just have to trust Him and pursue Him. If I don't want to end up like the servant that was cast out because he did nothing with the talents given to him by his master (Matthew 25:14-30), I need to pick myself up and DO. Something.

What a simple thought, but what a difficult task to carry out. I've listened to this story countless times, yet I'm still unable to internalize the lesson behind His Truth. I still stay rooted to where I am, stubbornly refusing to take a leap of faith.

To those of you that read my blog and know me, thank you for reading. To those of you that do not know me, (and can't understand why this author is spending time posting about feelings and whatnot) I still thank you for reading. I don't know how much longer I will keep up with this blog, but I hope I can. I hope that, by posting up a more raw, personal statement, I'll be more motivated. Not only motivated to post about my crafting endeavors, but to also pick myself up and do WORK.

Even though its three months later... Let's not over-think things and get down to work.

As always, thanks for reading! Here's to more posts to come.

:)

Wednesday, January 1, 2014

Canvas Photos

Hello World!

Since Christmas just rolled by... I had the chance to make a lot more crafts than usual. Because... Well, I had a deadline to meet: presents!! But I couldn't reveal my latest crafting endeavors until after Christmas was over. Haha. So... Here we go! Canvas photos!

This is one of the first crafting projects that I ever pinned on Pinterest, so I've been looking for the opportunity to do this project for a long time. The concept is rather simple: print out a photo on regular paper, and then transfer that ink onto a mounted canvas of your choice. The blog that I followed gave some pretty good tips and tricks, and now I'm adding a few more tips of my own. :)

To start off, gather all your supplies:

- Printed copy of desired picture
- Mounted canvas
- Gel medium (I used Liqudex, purely because that was the brand the blogger used and I didn't know which one to use. Haha)
- Spray bottle with water
- Newspaper (it gets messy!)
- Furniture oil
- Cloth for oil

One thing to keep in mind for this project is that there's always a bit of trial and error. I thought I would be pleased with my first attempt at this project, but I ended up redoing more than half my pictures because I didn't like how they turned out. Haha. 

For the canvases, I chose ones with a thick frame because I wanted the finished project to be able to stand up on its own. I chose small canvases (size 4x4 and 5x5) because I was afraid of starting with a canvas that was too difficult to work with. Even so, the "larger" canvas I used was already a challenge to work with. 

When I first printed out my pictures, I sized all my photos on Word so that I could print out more than one picture on one page. That... Was my first mistake. Haha. Even though the canvas that I was working with was rather small, it's still better to print out a picture with high resolution. After I complete my first batch of photos.... I was so displeased with the results that I had to redo them (I'll show you what I mean). For the second batch I printed the photos straight from Photoshop, which turned out much, much better. Another tip to keep in mind is that pictures with dark colors are a lot easier to work with than pictures with light colors, even if dark photos use more ink. Haha. 


With that being said... Let's move on to the actual project, shall we? I printed out my photos with the measurements being slightly smaller than the actual canvas size in order to give the finished product a border. I also inverted the photos so that the finished project would have an image that was facing the correct way. After printing out the photo, I painted a thin layer of the mat gel onto the canvases and placed the photo over them. I used a light behind the canvas and photo in order to center it. Then I rubbed the photo onto the canvas so that no gel bubbles remained. This is why you don't want to have a thick layer of gel. If the mat gel is too thick, it's easier for the picture to bunch up and form wrinkles in your picture. Another challenge I ran into was that the larger the frame/canvas, the less stable the canvas was. For the small frame, I could easily press the photo down, but with the larger frame, the center of the canvas was less stable, making it harder for me to ensure that the photo was properly glued to the canvas. 

After all photos were completed, I let the photos dry overnight. 


The next evening, I laid out some newspaper on the floor to catch the mess I was about to make. Hahaha. I took a spray bottle and sprayed the photo. The first time I sprayed too much water and ended up dripping water on the floor. The trick is to spray slowly and let the water soak into the paper before proceeding. 


After the water soaks through, start rubbing! Basically, here we are rubbing all the paper off, leaving the ink on the canvas. Since there is so much excess paper, I started by rubbing/tearing off the paper on the sides first. 


Before long, I could start to see the picture show through! Once you get a generous layer of paper off the canvas, I would start to slow down. When I was doing this part... I was watching dramas and I didn't really pay that much attention to my photo, which resulted in....


... This. Whoops. Haha. Although the missing paint effect makes everything look more vintage-y... It happened a lot quicker than I expected. Once a little bit of paint starts peeling off, it becomes a lot easier for paint to continue peeling off... So be careful!


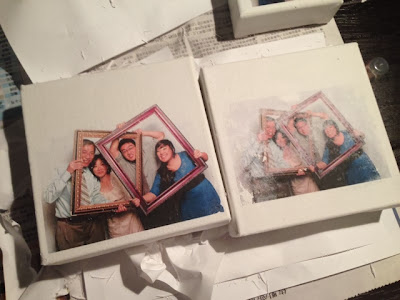
This was my first batch of finished photos. As you can see, the lighter colored ones are still a little cloudy looking. That's because the paint started peeling too much, so I couldn't rub off any more. 

The blog said that I could take away the cloudiness if I used funiature oil, so I went out and got some furniture oil. Who knew it only came in such large quantities? I guess it make sense since you'd need a lot of oil for one piece of furniture. It took away the cloudiness for a little bit... But once the oil dried, the cloudiness returned. 


It looked good for a while.... But not for long... So I decided to try the project one more time. This time... I was ready....!


Again... Dark photos turned out much better than light ones. But dark ones are also considerably harder to get paint off at all (making it hard to create the "vintage" effect)


Here are some comparison photos from my first batch with my second batch. 


Much better. There was still some cloudy residue, even on the second batch... But I discovered that, if I load up on furniture oil (and I mean LOAD up. Don't be shy! Haha), the cloudiness really did go away. 

Finally I coated the picture with the mat gel that I used in the very beginning. This was more in order to seal in the photo and give it a waterproof cover. 


And viola! Canvas photos! Let me know what you guys think, or if you guys have any questions! 


As always, thanks for reading!

:)

Oh! And Happy New Year!!